 Moto E6 (E6, E6 Plus, E6 Play, E6S) is a major update for Moto E series with improved camera, fingerprint reader, face unlock, and many other improvements.
This Moto E6 guide shows you how to use Moto E6 camera (mainly E6 Plus), how to customize Moto E6 camera settings, how to take portrait mode photos, how to customize and apply face beauty filter.
Please note the cameras on the four Moto E6 phones are slightly different. But all of the features mentioned in this guide should work on all these four Moto E6 models.
Two different camera apps on Moto E6 phones
On the four Moto E6 phones (Moto E6, E6 Plus, E6 Play, and E6s), Motorola used two different camera apps.
- Moto E6 Plus (Moto E6s in India) has a new camera app that has not been found in other Moto E phones.
- Moto E6, E6 Play, and E6s use the standard Moto Camera app.
It is unclear why Motorola/Lenovo did not implement the same camera app on the later Moto E6 models.
Of course, it is also very confusing. But it seems it is the new norm of Motorola: lack of consistency.
As Moto E6 Plus (E6s in India) is the most popular model of the Moto E6 family, this guide will use this new camera app for the demonstration.
If you are using Moto E6, E6 Play, and E6s 2020, then the camera app interface is slightly different. But the features are similar.
Actually, the camera app on Moto E6 plus is very user friendly and looks very clean. Unreliable features like the manual model were removed from the interface
How to launch the Moto E6 camera?
You can launch the Moto E6 camera even without unlocking the phone. You can also launch it without tapping the camera app icon.
Method 1: Tap or swipe the camera app icon
You can tap the Camera app icon on the Home screen or the Apps screen (app drawer) to launch the camera, just like using other apps.
But on the lock screen, you need to swipe the camera app icon (which can be found on the bottom right corner) to the centre of the screen to launch the camera without unlocking the phone.
On Moto E6 (and other Moto E phones), you can also use the power button to quickly launch the camera app from any screen (lock screen, home screen) without closing the currently active app.
Regardless of what you are doing, you can quickly press the power button twice to launch the camera app. Motorola named this feature as Jump to camera, which is available in almost all Moto phones.
A few other Android manufactures also offer a similar gesture for you to launch the camera very quickly and at any time (you do not need to close the current app). For example, Samsung also lets you press the side key twice to launch the camera app and names it as the camera quick launch.
By default, Jump to camera gesture is enabled on Moto E6. You can disable or re-enable it in Settings —System —Gestures — Jump to camera.
Method 3: Use voice command to launch Moto E6 camera
You can also use Google Assistant to launch the camera app on Moto E6.
By default, Google Assistant is enabled in Moto E6. You can access Google Assistant by using Hotword “Hey Google”, or holding the Home button for a few seconds.
Once Google Assistant is launched, you can use a few voice commands, including “take a photo” or “open camera app”, to launch the camera app on Moto E6.
You can also combine “Hey Google” with “take a photo” in one voice command.
Understand items on Moto E6 camera app interface
When you open the camera app on Moto E6, by default, it will be in the Photo mode (aka Auto mode), as shown in the screenshot below.
You can normally find the following 14 items in the Photo (auto) mode. In other camera modes, the items may be slightly different or fewer.
#1. Flash
You can choose to turn the flash on, off, or auto.
The LED flash is located close to the rear camera lens.
When you use the front camera, the screen can be lit up and used as the flash. There is no real LED flash for the front camera.
#2. Photo size setting
You can choose the aspect ratio (photos size) of the photo to be taken. There are 3 options for photos:
- 13MP at 4:3 aspect ratio for the rear camera (8MP for the front camera).
- 9MP at 1:1 ratio for the rear camera (3MP for the front camera).
- 7MP at 19.5:9 ratio (full screen) for the rear camera (4M for the front camera).
If you are in the video mode, the video size settings can be with 1080p, 720p, or full screen.
You may check this guide on the detailed explanation of the photo size and aspect ratios.
You can turn on or turn off the HDR (high dynamic range) for both front and rear cameras.
Of course, most of the time, you leave it as automatic.
#4. More settings
You can access more settings, for example, set up the timer, turn on/off location info. Read on.
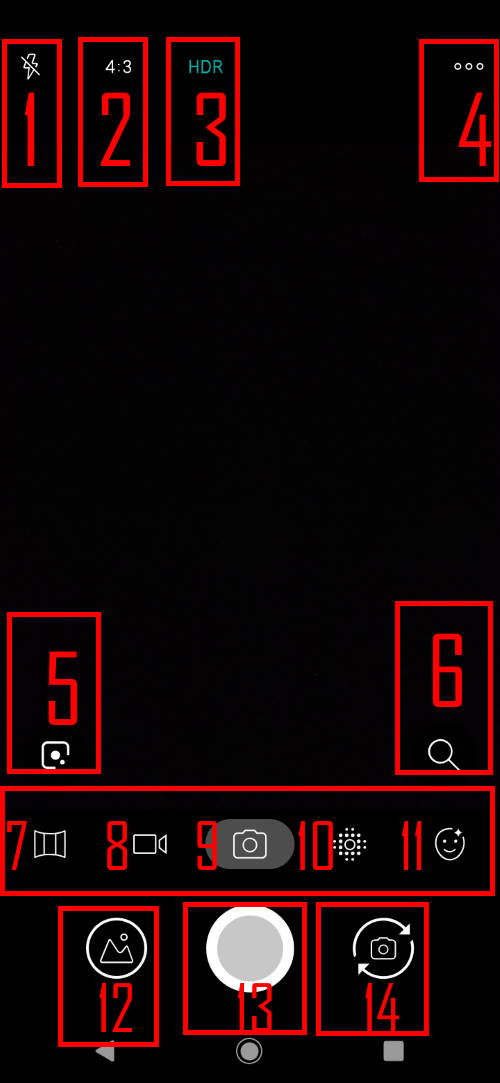
#5. Google Lens
You can use this button to launch Google Lens, which can deliver some useful information about the object identified in the camera.
Google Lens also offers a few other tools including scanning and translating text, finding popular items on the menu, exploring nearby landmarks.
#6. Zoom
The digital zoom offered by Moto E6 is quite good, compared to the cameras in other entry-level smartphones.
You can tap the button to change the zoom level. You can also use pinching or spreading gestures to zoom in and zoom out.
If you swipe up or down on the viewfinder, you can also zoom in or zoom out.
#7. Panorama mode
The panorama mode lets you shoot panoramic photos with Moto E6 camera.
There are two limitations of panorama mode on Moto E6 camera:
- It can only shoot in portrait orientation.
- It can only take up to 10 snaps and limited to 180 degrees.
#8. Video mode
Both front and rear cameras on Moto E6 allow you to record full HD (1080p) videos.
You can also take photos when recording videos.
#9. Photo mode (Auto mode)
The photo mode, aka auto mode, is the default camera mode on Moto E6. It will automatically apply the best settings based on the lighting conditions and the scene.
There is no dedicated night mode on Moto E6. If you need to take photos in the darkness, you need to use the photo mode.
#10. Portrait mode (Bokeh)
The portrait mode (Bokeh) lets you blur the background to highlight an object. It is available for both the front and the rear cameras on Moto E6.
You can choose the level of blurring for the background.
On Moto E6, it is called Portrait mode for the front camera, and Bokeh mode for the rear cameras. They are essentially the same.
#11. Face beauty filter
You can use the face beauty filter to make you look better. Read on.
#12. Shortcut to Google Photos
The thumbnail is a shortcut to the Gallery app. On Moto E6, it is a shortcut to Google Photos.
You can tap the shutter button to take photos. If you are in the video mode, the recording button will be slightly different.
In addition to tapping the shutter button, you can use the other two methods to take photos on Moto E6. Read on.
#14. Front/rear camera switch
You need to tap this button to switch between front and rear cameras.
Moto E6 camera settings
The Moto E6 Plus camera app is very clean and easy to use, compared the standard Moto Camera or Moto Camera 2.
The only missing feature of Moto E6 Plus camera app is the manual mode, which does not work well on Moto E series at all.
All camera modes and frequently used features are placed on the main interface of the camera app, as shown earlier.
The More settings button ( marked as 4) lets you tweak other camera settings.
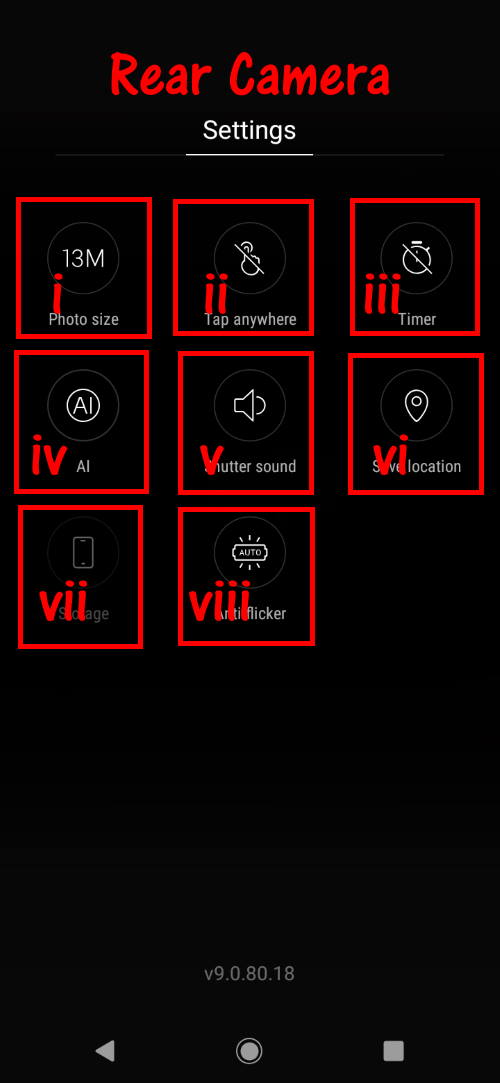
As shown in the screenshot below, for the rear camera, you can change the settings in the following 8 categories.
i. Photo size
The photo size setting offers the exact number of pixels (MP) for each aspect ratio.
ii. Tap anywhere
You can choose to tap anywhere on the screen to change focus to the tapped location AND take a photo.
By default, when you tap anywhere on the viewfinder on the screen, you change the focus to the tapped location. You then can tap the shutter button to take a photo.
After you enable tap anywhere, you essentially combine these two steps.
iii. Timer
You can set a 2s, 5s or 10s timer to take photos automatically.
iv. AI
You can enable AI (artificial intelligence) for the rear camera.
But it seems this setting does not have any noticeable impact on the photos. Very likely, Moto E6 camera use the AI regardless of this setting.
v. Shutter sound
You can turn on or off the shutter sound, which is required in a few countries.
But in most regions, the shutter sound on Moto E6 is always off.
vi. Save location
You can choose to save the location info in the metadata of the photo or not. If the location info is saved, you can pinpoint the location where the photo was taken, even after many years.
Please note, when you sharing photos though Google Photos, by default, the location will be stripped automatically.
vii. Storage
If you use a micro SD card on Moto E6, you can choose to save the photos and videos on the micro SD card or internal storage.
This option greys out if there is no micro SD card is detected.
Please note, you cannot save photos directly to USB thumb drives.
viii. anti-flicker
You can use antiflicker to prevent horizontal or vertical lines on your photos and flickering in your videos.
You may choose antiflicker to off, auto, 50Hz, or 60Hz.
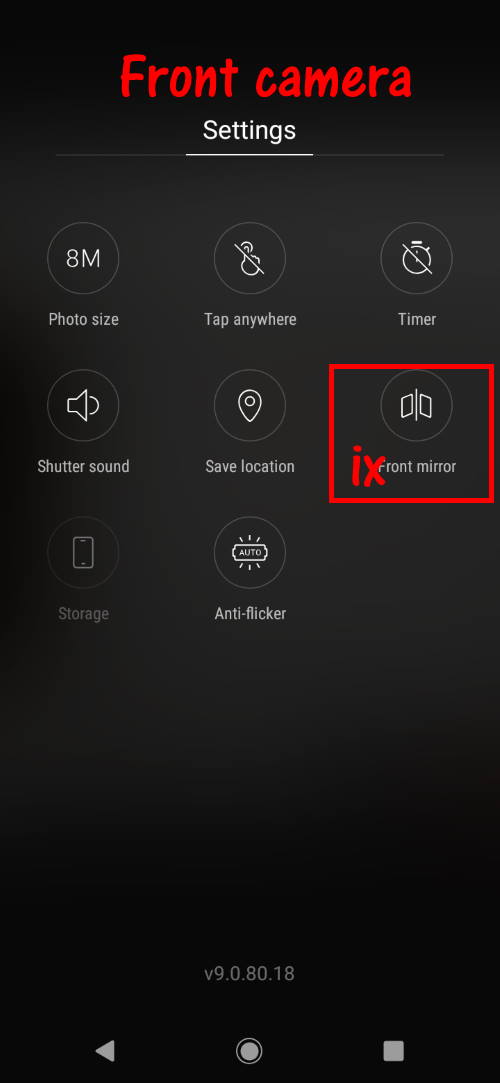
ix. front mirror
For the front-facing camera, as shown above, there is one additional setting for you to mirror or to stop mirroring the selfie.
When using the front (selfie) camera, the image in the viewfinder is always a mirror image: left and right are reversed, and the text looks backwards.
If you want to take a selfie with what you see in the viewfinder, then you need to enable the front mirror. This is the default setting.
You can disable the front mirror so that you will flip the mirrored photo. The text can be read normally. The photo will look like the one taken with the rear camera.
Please note, this option only affects photos saved. It does not affect the viewfinder.
3 ways to take photos on the camera app on Moto E6
As mentioned above, there are at least 3 different ways to take photos on the camera app on Moto E6.
The shutter button is always available. You can tap it to take photos at any time.
Method 2: Tap anywhere to launch Moto E6 camera
You need to enable Tap anywhere in the camera setting discussed above.
After enabling Tap anywhere, you can tap anywhere on the viewfinder to lock the focus and take a photo in one step.
You can also take photos by pressing the volume down button.
How to use the burst shot mode on Moto E6?
You can take 10 burst shot photos by holding the shutter button, or holding the volume down button.
Please note, Moto E6 only allows you to take up to 10 burst shot photos on one shot in the burst mode.
The burst shot mode is not available if you set the HDR to on. You need to set it to Auto or off to use Moto E6 burst shot mode.
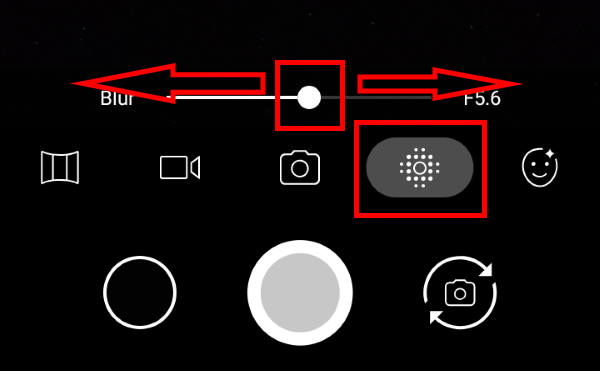
How to take portrait mode (broken) photos with Moto E6 camera?
Both the front camera and the rear camera on Moto E6 support portrait mode.
As shown in the screenshot below, you can choose the portrait mode, then drag blur bar to increase or decrease the background blurring.
Ideally, the main object should be within 1.5-3m from the camera to get the nest result.
How to use the Face Beauty filter on Moto E6 camera app?
Moto E6 camera also has the Face Beauty filter for you to look better in the photo.
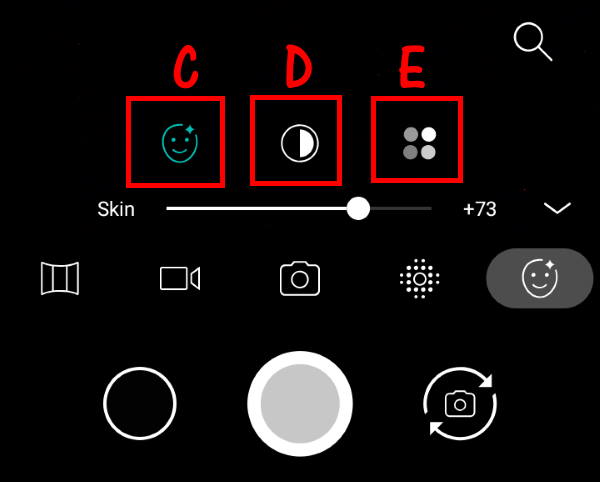
But many owners are not aware that there are 3 components of the Face Beauty filter on Moto E6:
- Soften and even skin tone.
- Brighten face.
- Add a rosy tone.
To use the Face Beauty filter on Moto E6, tap the Face Beauty button (marked as A), as shown in the screenshot below.
By default, only the softening skin tone option shows. You need to tap the ^ button (marked as B) to access all 3 filters/components.

As shown below, now, you can not only soften the skin tone (C), but also brighten the face (B) and add a rosy tone (C).
Do you have any questions on using the camera on Moto E6, E6 Plus, E6 Play, and E6s 2020?
If you have any questions or encounter any problems on the camera on Moto E6, E6 Plus, E6 Play, and E6s 2020, please let us know in the comment box below.
The community will try to help you, and you will help the Moto E owners community.
For more Moto E guides, please check this Moto E how-to guides page.
You may also check the official Moto E6 user guide for Moto E6, Moto E6 Plus. Moto E6 Play, and Moto E6s 2020 here.
Moto E6 specific guides can be found here.
You are welcome to join our Facebook and Youtube community.
teacher Gord says
How do I turn the dammed thing OFF and how do I remove it from turning on when I am mesaging and showing up under my messages? I don’t want to be sending photos of my knees or where I am every damm time I am using the messages – howd o I turn this dammed dammed dammed thing off?
simon says
What are you referring to? The camera should not open automatically in your messaging app. It opens only when you try to attach a photo or video.
NEW!! Facebook page || Moto G How-to guides || Android Guides || Chromecast Guides || Galaxy S6 Guides || Galaxy S7 Guides || Galaxy S8 Guides || Galaxy S9 Guides || Google Home Guides || Galaxy S10 Guides || | Galaxy S20 Guides || Headphone Guides ||teacher Gord says
Sorry, this thing is extremely frustrating- there are no instructions, It keeps trying to make me use things I don’t want and especially, especially there is no OFF button anywhere for anything. I tried the internet radio and couldn’t turn it off I even shut down the phone and still heard it! I don’t know how I finally got it off.
I have the MOTO E G32. it is over 6 inches display . It is larger than the ones you are showing so I think it is new.
…
I just found out that there is an icon right by the message that turns on the camera displaying beneath the messages when I am messaging. It is RIGHT BESIDE the test so I keep hitting it. I want to remove that DAMM icon. I don’t want to accidentally send a pic of where I am. which I almost did several times.Just a matter of tiem before I mess up.
I still don’t know how to turn the camera off, I have to shut down the phone and I can’t even find the button that takes pictures I just can find the record button I got ten recordings of my knees.
There are no obvious buttons for things if they exist at all. And no damm instruction book. not even on the internet.
It keeps prompting me to use google things i don’t want and I wouldn’t touch with a 50 foot pole . Google is evil.I DECIDE what I WANT, not someone else.
Thanks
simon says
Not sure about the messaging app issue. Actually Moto E uses the almost-stock android messaging app.
But the default messaging app should look like this:
1. for you to attach something; 2. to attach photos or videos including open the camera (which may annoy you); 3. show typed text; 4. to insert emojis/icons; 5. to add audio recording.
Anyway, most Android phones use a similar messaging app.
NEW!! Facebook page || Moto G How-to guides || Android Guides || Chromecast Guides || Galaxy S6 Guides || Galaxy S7 Guides || Galaxy S8 Guides || Galaxy S9 Guides || Google Home Guides || Galaxy S10 Guides || | Galaxy S20 Guides || Headphone Guides ||teacher Gord says
Correction : s/b “right beside the text”
teacher Gord says
OK thanks.I figured out why the camera has no OFF button – because it is always on. the #2 icon does not open the camera, it is already open – it just shows the camera and gallery in a small window beneath the messaging text.
So there is always the danger of accidentally taking pics and video and sending them to whomever. So I am taping over all Three of the camera openings.to manually control what the camera can see- I have no idea if what it can see is streaming to some site or not. I certainly don’t trust google. The google assistant is actually spyware which is listening to everything wherever I am.
I tried chrome cast and was forced to allow it and in fact google virtually raped me in making me give personal information to install the chrome cast. Then I discovered that the chrome cast is doubling my data usage , more than doubling +15 G a month for the screens. So I took a hammer and destroyed the evil thing and threw it in the garbage. It is actually a second cell phone receiver , it is not receiving the stream from the cell phone as google misrepresented it. It is a second data stream. + high definition screen savers (15G a month worth).
Now I need to make sure all google asps are UNINSTALLED. I only want the cell phone for text + calls and use the smart phone when i can use public internet. I use prepaid. I have to be careful. If I prepay too much then I could accidentally use some services and be charged for that So now I have to be absolutely sure there are zero dollars in my account which unfortunately now is not the case. So now I have to be absolutely sure I do not accidentally use anything that will cost me data until I exhaust my balance and get back to normal. Which will be the end of August – big mistake to prepay too far in advance. Only prepay a day before due date to be safe – then no money in the account and no services can be activated. I can still use smartphone in public internet places – that is ideal.. Also I see that google is trying to manipulate peoples minds by force feeding unwanted news stories so the thing is very very evil. I would like to find honest software that does not try to turn me into a silicon valley puppet or slave extension of a google executive. But perhaps that is impossible. .
I know too much, I know! I am a retired programmer analyst, withe expertise in mainframes, assembler and machine language.The cellphones were designed to keep people as ignorant as possible and take advantage of their ignorance, I can see that.
Thanks for your diagram input.
Vanessa says
Can somebody please tell me how to flip a selfie video, not photo? Thank you!
simon says
Nope, you can flip a photo, not a video on Moto devices.
NEW!! Facebook page || Moto G How-to guides || Android Guides || Chromecast Guides || Galaxy S6 Guides || Galaxy S7 Guides || Galaxy S8 Guides || Galaxy S9 Guides || Google Home Guides || Galaxy S10 Guides || | Galaxy S20 Guides || Headphone Guides ||teacher gordon says
Thanks, I am getting used to it now
nvidia a100 says
Pretty! This has been a really wonderful post. Many thanks for providing these details.
free crm says
very informative articles or reviews at this time.